
구글 로그인에 이어서 네이버 로그인을 구현 하겠다.
1. 네이버 OAuth 서비스 등록
https://developers.naver.com/main/
NAVER Developers
네이버 오픈 API들을 활용해 개발자들이 다양한 애플리케이션을 개발할 수 있도록 API 가이드와 SDK를 제공합니다. 제공중인 오픈 API에는 네이버 로그인, 검색, 단축URL, 캡차를 비롯 기계번역, 음
developers.naver.com
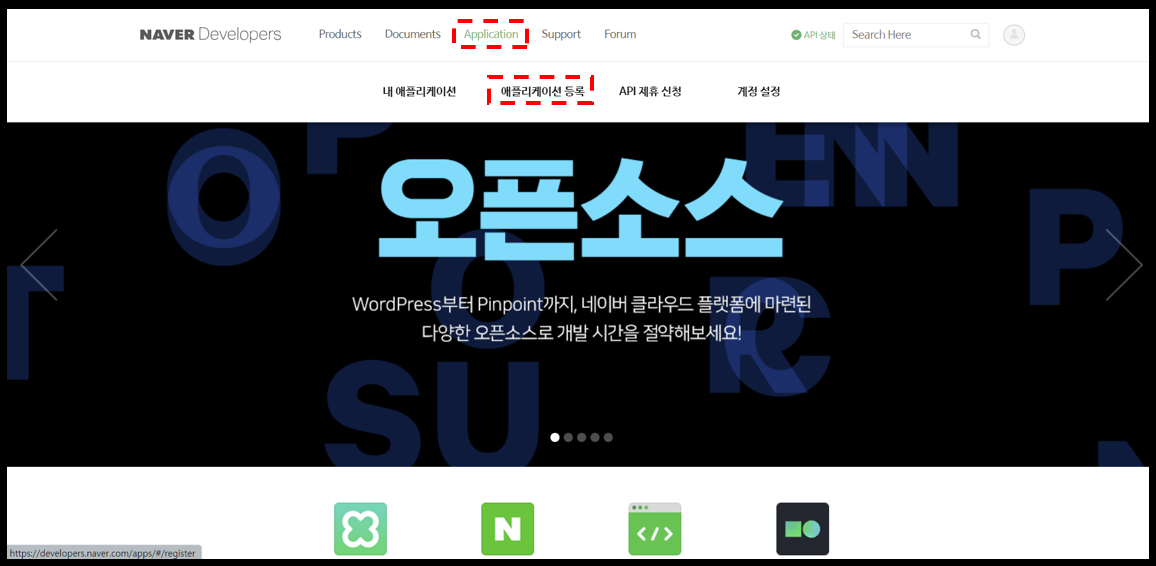
1-1) "애플리케이션 등록" 화면으로 이동
- [Application] -> [애플리케이션 등록] 클릭한다.
1-2) "애플리케이션 등록" 진행
- "애플리케이션 등록" > "애플리케이션 이름" 입력
- "애플리케이션 등록" > "사용 API" > "네이버 로그인" 선택 > "제공 정보 선택" > '회원이름' , '연락처 이메일 주소' , '별명' 선택
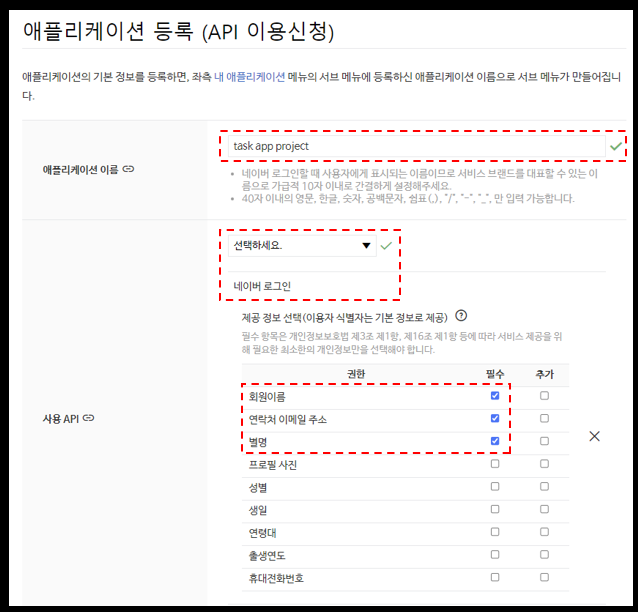
- "애플리케이션 등록" > "로그인 오픈 API 서비스 환경" > "환경 추가" > "PC 웹"
> "서비스 URL" : "http://localhost:8080"
> "네이버 로그인 Callback URL" : "http://localhost:8080/login/oauth2/code/naver" 입력

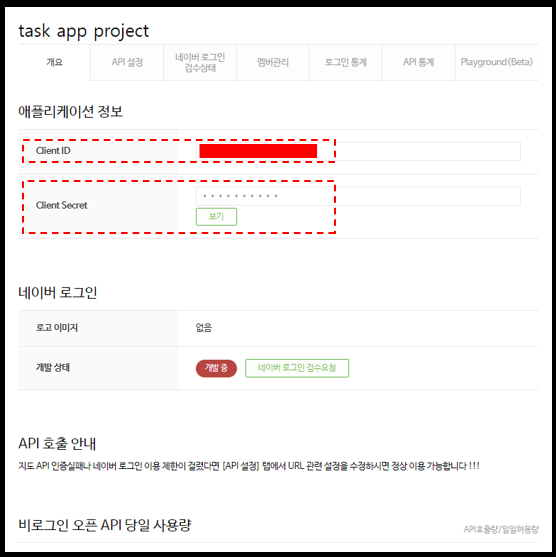
1-3) 부여받은 Client ID, Client Secret
2. application-oauth.yml 에 NAVER OAuth2 정보 등록하기
spring:
  security:
    oauth2:
      client:
        registration:
          google:
            client-id: "your-google-client-id"
            client-secret: "your-google-client-secret"
            scope:
              - profile
              - email

          naver:
            #NAVER 'client-id' , 'client-secret' , 'scope'
            client-id: "your-naver-client-id"
            client-secret: "your-naver-client-secret"
            scope:
              - name
              - email
              - nickname

            #NAVER Spring Security 수동 입력
            redirect-uri: http://localhost:8080/login/oauth2/code/naver
            authorization-grant-type: authorization_code
            client-name: Naver

        provider:
          #NAVER provider 등록
          naver:
            authorization-uri: https://nid.naver.com/oauth2.0/authorize
            token-uri: https://nid.naver.com/oauth2.0/token
            user-info-uri: https://openapi.naver.com/v1/nid/me
user-name-attribute: responsespring.security.oauth2.client.registraion.naver 위치에 등록한다.
<NAVER 'client-id' , 'client-secret' , 'scope'>
google 과 동일하게
- 'client-id'
- 'client-secret'
- 'scope'
를 등록한다.
<NAVER Spring Security 수동 입력>
네이버는 스프링 시큐리티를 공식 지원하지 않기 때문에, 직접 등록해야한다.
- 'redirect-url'
- 'authorization-grant-type'
- 'client-name'
을 입력한다.
<NAVER provider 등록>
spring.security.oauth2.client.provider.naver 위치에 등록한다.
authorization-uri: https://nid.naver.com/oauth2.0/authorize
token-uri: https://nid.naver.com/oauth2.0/token
user-info-uri: https://openapi.naver.com/v1/nid/me
user-name-attribute: response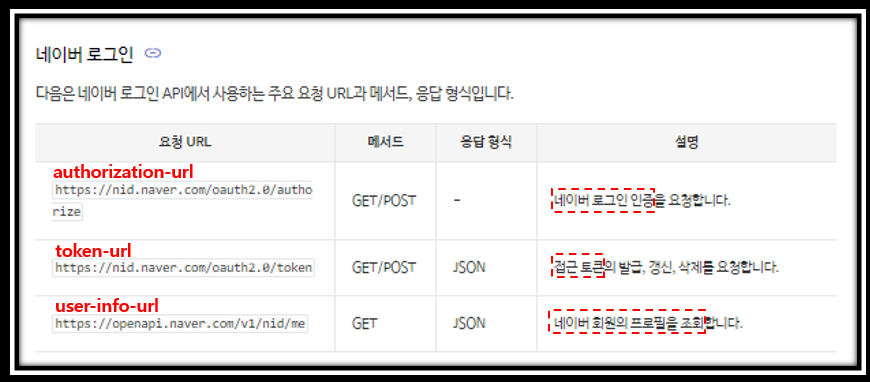
네이버 로그인 방식 오픈 API 에서 제공하는 방식대로 Provider 의 URL 들을 등록한다.
아래는 해당 문서의 페이지 링크이다.
네이버 오픈API 종류 - Open API 가이드
네이버 오픈API 종류 네이버 오픈API는 인증 여부에 따라 로그인 방식 오픈 API와 비로그인 방식 오픈 API로 구분됩니다. 로그인 방식 오픈 API 로그인 방식 오픈 API는 '네이버 로그인'의 인증을 받아
developers.naver.com
※ application.yml 에 application-oauth.yml 이 include 되어 있어야 한다.
3. OAuthAttributes.class
@AllArgsConstructor
@NoArgsConstructor
@Builder
@Getter
@ToString
public class OAuthAttributes {
    private Map<String, Object> attributes;
    private String nameAttributeKey;
    private String username;
    private String email;
    private UserRole role;

    //인증자가 누구인지 구분 메서드
    public static OAuthAttributes of(String registrationId,
                                     String usernameAttributeName,
                                     Map<String, Object> attributes) {
        //1. Google
        if (registrationId.equals("google")) {
            return ofGoogle(usernameAttributeName, attributes);
        }

        /*//2. Kakao
        if (registrationId.equals("kakao")) {
            return ofKakao(usernameAttributeName, attributes);
        }*/

        //3. Naver
        if (registrationId.equals("naver")) {
            return ofNaver(usernameAttributeName, attributes);
        }

        return null;
    }

    private static OAuthAttributes ofNaver(String usernameAttributeName, Map<String, Object> attributes) {
        Map<String, Object> response = (Map<String, Object>) attributes.get("response");

        return OAuthAttributes.builder()
                .username((String) response.get("email"))
                .email((String) response.get("email"))
                .attributes(response)
                .nameAttributeKey(usernameAttributeName)
                .build();
    }

    /*ofGoogle 메서드 생략*/
4.Thymeleaf
<!--login.html 中...-->

	<!--간편 로그인-->
        <div class="social-login-container">
            <!--구글 로그인-->
            <a href="/oauth2/authorization/google" role="button" class="social-login-btn">
                <img src="/img/google-logo.png" alt="google-login" class="login-img"/>
                구글로 로그인
            </a>
            <!--네이버 로그인-->
            <a href="/oauth2/authorization/naver" role="button" class="social-login-btn" style="background: #1EC800;">
                <img src="/img/naver-logo.png" alt="naver-login" class="login-img"/>
                네이버로 로그인
            </a>
            <!--카카오 로그인-->
            <a href="" role="button" class="social-login-btn" style="background: #FEE500;">
                <img src="/img/kakao-logo.png" alt="kakao-login"  class="login-img"/>
                카카오로 로그인
            </a>
</div>"/oauth2/authorization/naver" 로 URL 을 설정한다.
5. 완성 화면
[1. 네이버 로그인 전]
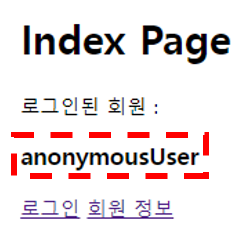

현재 로그인 되지 않은 상태이고, Member Table 에도 네이버 로그인 회원이 존재하지 않는 것을 확인 할 수 있다.
[2. 네이버 로그인 후]
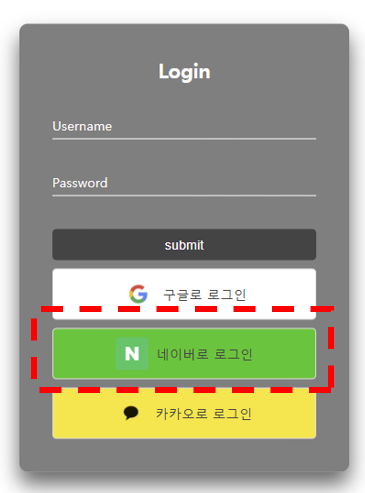
"네이버로 로그인" 버튼을 눌러 네이버 로그인을 진행한다.
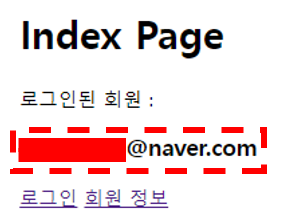

"SOCIAL" 권한으로 네이버 로그인 회원이 Member Table 에 저장된 것을 확인할 수 있다.