
[개요]
Frontend / Backend / DB로 구성된 프로젝트를 개발하는 과정을 기록합니다.
각각을 독립적인 서버로 구성하여 하나의 웹 서비스를 배포하는 것을 목표로 합니다.
이를 통해 시스템의 확장성과 유지보수성을 높이고, 실제 운영 환경과 유사한 구조를 경험하는 것이 목표입니다.
이번 포스팅은 Frontend / Backend / DB 로 구성된 웹 서비스 프로젝트를 구현하는 것을 목표로 합니다.
프로젝트 주제는 "단축 URL 서비스" 입니다.
긴 URL을 입력하면, 짧은 URL을 생성해주는 서비스 입니다.
단축된 URL을 누르면 원본 URL로 리다이렉트 해줍니다.
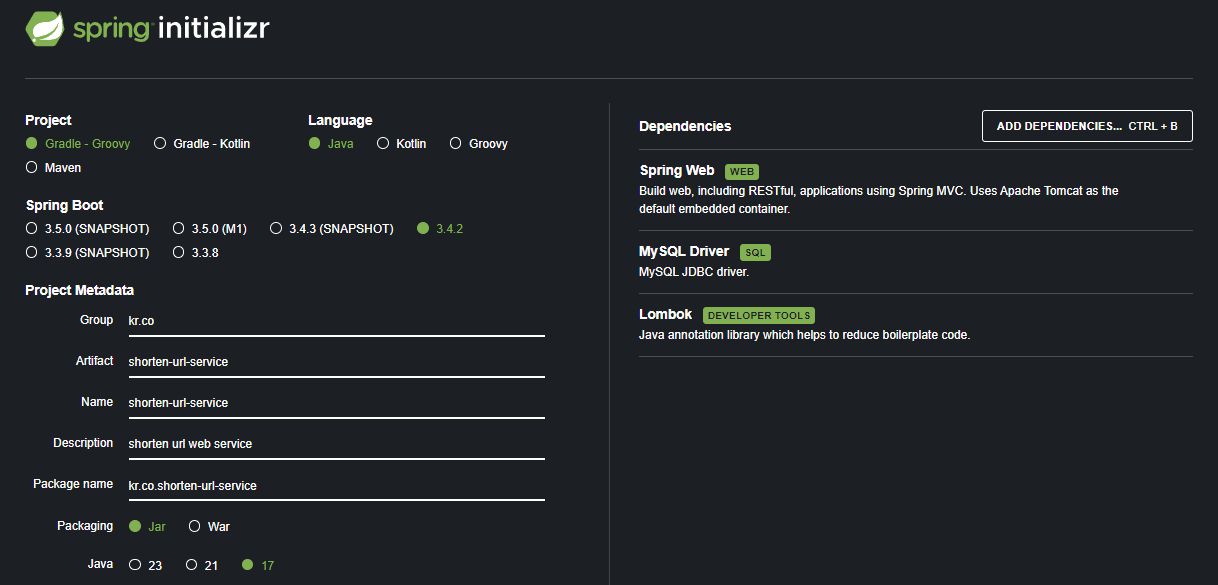
[프로젝트 파일 생성 - https://start.spring.io]
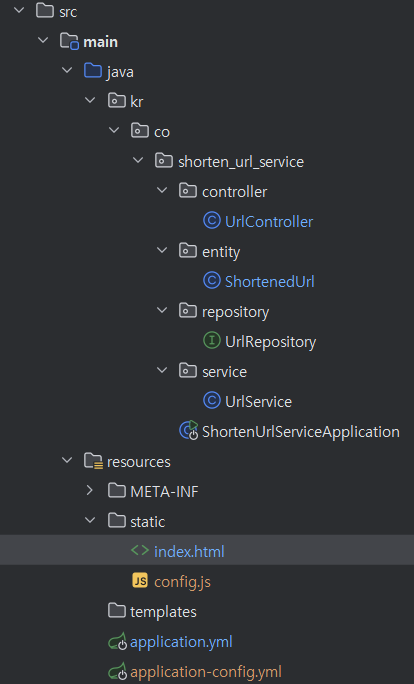
[프로젝트 트리 구성]
[application.yml (+ application-config.yml)]
[application.yml]
spring:
  profiles:
    include: config

  datasource:
    driver-class-name: com.mysql.cj.jdbc.Driver
    #DB Server 의 ip add + 3306 port 로 연결을 해야 함.
    #backend Server -> DB Server
    url: jdbc:mysql://{DB Server ip address}:3306/shorten_url_service
    username: root
password: 12345678DB Server 의 IP 주소 + MySQL의 3306 포트 번호 + 스키마 이름을 조합해서 'url'을 설정한다.
[application-config.yml]
server:
  # frontend-server 'ip address' + 'port number (80)'
base-url: http:/{frontend-server ip address}:80클라이언드의 브라우저가 접속하는 IP주소인 Frontend-server IP주소와 http의 80 포트를 'base-url' 로 사용자 지정을 해준다.
[Entity - ShortendUrl.java]
package kr.co.shorten_url_service.entity;

import jakarta.persistence.*;
import lombok.Getter;
import lombok.Setter;

@Entity
@Getter
@Setter
public class ShortenedUrl {

    @Id
    @GeneratedValue(strategy = GenerationType.IDENTITY)
    private Long id;

    @Column(nullable = false, unique = true)
    private String originalUrl;

    @Column(nullable = false, unique = true)
    private String shortKey;

}원본 URL을 의미하는 'originalUrl'
단축 URL의 고유의 키로 사용될 'shortKey'
ex) 원본 URL : 'https://www.naver.com'
shortKey : 'G5gJ5Q'
이 경우 'https://www.naver.com'에 대응되는 단축URL은 "http://{frontend-server-ip}:80/api/ G5gJ5Q" 이런 형식이 된다.
[Repository - UrlRepository.java]
package kr.co.shorten_url_service.repository;

import kr.co.shorten_url_service.entity.ShortenedUrl;
import org.springframework.data.jpa.repository.JpaRepository;

import java.util.Optional;


public interface UrlRepository extends JpaRepository<ShortenedUrl, Long> {

    Optional<ShortenedUrl> findByShortKey(String shortKey);
    Optional<ShortenedUrl> findByOriginalUrl(String originalUrl);
}
[Service- UrlService.java]
package kr.co.shorten_url_service.service;

import kr.co.shorten_url_service.entity.ShortenedUrl;
import kr.co.shorten_url_service.repository.UrlRepository;
import lombok.RequiredArgsConstructor;
import org.springframework.stereotype.Service;
import org.springframework.transaction.annotation.Transactional;

import java.util.Optional;
import java.util.Random;

@Service
@RequiredArgsConstructor
@Transactional(readOnly = true)
public class UrlService {

    private final UrlRepository urlRepository;
    private static final String CHARACTERS = "abcdefghijklmnopqrstuvwxyzABCDEFGHIJKLMNOPQRSTUVWXYZ0123456789";
    private static final int SHORT_KEY_LENGTH = 6;
    private final Random random = new Random();

    //단축 URL 생성 로직 - (ShortenedUrl 객체 생성 (originalUrl, shortKey))
    @Transactional
    public String shortenUrl(String originalUrl) {
        //originalUrl 을 이미 단축 URL 생성한 적이 있는지 확인
        Optional<ShortenedUrl> url = urlRepository.findByOriginalUrl(originalUrl);
        if (url.isPresent()) {
            return url.get().getShortKey();
        }

        String shortKey;
        do {
            shortKey = generateShortKey();
        } while (urlRepository.findByShortKey(shortKey).isPresent());

        ShortenedUrl shortenedUrl = new ShortenedUrl();
        shortenedUrl.setOriginalUrl(originalUrl);
        shortenedUrl.setShortKey(shortKey);
        urlRepository.save(shortenedUrl);

        return shortKey;
    }

    //원본 URL 조회
    public Optional<String> getOriginalUrl(String shortKey) {
        return urlRepository.findByShortKey(shortKey)
                .map(shortenedUrl -> shortenedUrl.getOriginalUrl());
    }

    //단축 키 생성
    private String generateShortKey() {
        StringBuilder sb = new StringBuilder(SHORT_KEY_LENGTH);
        for (int i = 0; i < SHORT_KEY_LENGTH; i++) {
            sb.append(CHARACTERS.charAt(random.nextInt(CHARACTERS.length())));
        }
        return sb.toString();
    }
}
private static final String CHARACTERS = "abcdefghijklmnopqrstuvwxyzABCDEFGHIJKLMNOPQRSTUVWXYZ0123456789";
private static final int SHORT_KEY_LENGTH = 6;CHARACTERS 문자열 중 무작위 6개의 문자가 문자열이 되어, 그것이 단축URL을 위한 shortKey가 된다.
[Controller- UrlController.java]
package kr.co.shorten_url_service.controller;

import kr.co.shorten_url_service.service.UrlService;
import lombok.RequiredArgsConstructor;
import org.springframework.beans.factory.annotation.Value;
import org.springframework.http.HttpHeaders;
import org.springframework.http.HttpStatus;
import org.springframework.http.ResponseEntity;
import org.springframework.web.bind.annotation.*;

import java.net.URI;
import java.util.Map;
import java.util.Optional;

@RestController
@RequestMapping("/api")
@RequiredArgsConstructor
public class UrlController {

    private final UrlService urlService;

    @Value("${server.base-url}") //설정 파일(application.yml)에서 값 가져오기
    private String baseUrl;

    @PostMapping("/shorten")
    public ResponseEntity<Map<String, String>> shortenUrl(@RequestBody Map<String, String> request) {
        String originalUrl = request.get("url");
        String shortKey = urlService.shortenUrl(originalUrl);
        return ResponseEntity.ok(Map.of("shortUrl", baseUrl + "/api/u/" + shortKey));
    }

    @GetMapping("/u/{shortKey}")
    public ResponseEntity<Void> redirectToOriginal(@PathVariable String shortKey) {
        Optional<String> originalUrl = urlService.getOriginalUrl(shortKey);

        if (originalUrl.isPresent()) {
            // 302 Found 상태 코드
            HttpHeaders headers = new HttpHeaders();
            headers.setLocation(URI.create(originalUrl.get()));
            return new ResponseEntity<>(headers, HttpStatus.FOUND);
        } else {
            return ResponseEntity.notFound().build(); //404 응답
        }
    }
}
"/api/shorten" : 단축 URL 요청 주소
"/api/u/{shortenKey}" : 단축 URL을 통해 원본URL로 리다이텍트
[Frontend- index.html]
<!DOCTYPE html>
<html lang="ko">
<head>
    <meta charset="UTF-8">
    <meta name="viewport" content="width=device-width, initial-scale=1.0">
    <title>URL 단축 서비스</title>
    <style>
        body { font-family: Arial, sans-serif; text-align: center; margin: 50px; }
        input, button { padding: 10px; margin: 10px; }
        .result { margin-top: 20px; font-weight: bold; }
    </style>
</head>
<body>

<h2>URL 단축 서비스</h2>
<input type="text" id="originalUrl" placeholder="단축할 URL 입력">
<button onclick="shortenUrl()">단축하기</button>

<div class="result" id="result"></div>

<script src="config.js"></script>

<script>
    async function shortenUrl() {
        const urlInput = document.getElementById("originalUrl").value;
        const response = await fetch(`${config.baseUrl}/api/shorten`, {
            method: "POST",
            headers: { "Content-Type": "application/json" },
            body: JSON.stringify({ url: urlInput })
        });

        const data = await response.json();
        document.getElementById("result").innerHTML =
            `단축된 URL: <a href="${data.shortUrl}" target="_blank">${data.shortUrl}</a>`;
    }
</script>

</body>
</html>
[config.js]
const config = {
    // 배포 주소에 따른 유지보수
    //'backend-application-instance' 서버 ip 주소 + 포트번호 (8080)
    baseUrl : "http://{backend-server-ip-add}:8080"
}백엔드 부분에 요청을 하는 경우 사용될 ip 주소와 포트번호
'클라우드 서버 배포' 카테고리의 다른 글
| [3-Tier 프로젝트 배포] 2. Front-end Server 의 Nginx 설치 및 구동 + 환경 설정 (0) | 2025.03.01 |
|---|---|
| [3-Tier 프로젝트 배포] 1. 클라우드 서버 구축하기 (Vultr) (0) | 2025.03.01 |
| [3-Tier 프로젝트 배포] 0. 프로젝트 구성 설명 및 배포 과정 설명 (0) | 2025.02.25 |